If you're here, you're probably familiar with the rules of Sudoku: fill in the empty cells in the grid with the numbers 1 through 9 so that no row, column, or 3x3 box has two copies of some number. Beyond this simple description lies a wide variety of complex tactics that are used to solve puzzles. Many puzzles can be solved by simple tactics. However, the more difficult puzzles on Sudoku Slam have been designed to require more cleverness. This page explains tactics for solving these puzzles, and it also elaborates on the hints that you may encounter if you get stuck.
Terminology: We call any row, column, or 3x3 box in the Sudoku grid a group.
Candidate highlighting: Throughout this discussion, candidate highlighting is used extensively. To turn on candidate highlighting for a given number, click on that number in the "Highlight Candidates" box in the upper right corner or hold down the shift key and press the number. All the cells in the grid where that number can possibly appear will be highlighted in brown.
This technique is very simple. First, turn on candidate highlighting for given number. In the grid below, it has been turned on to highlight all the twos.

Notice that the bottom middle box, shown in green, has only one highlighted cell. That cell is the only place in the box where a 2 can go, and so it must go there.
The intersection tactic applies when the grid looks like this.

In this case the ones have been highlighted. Observe that the middle right box, shown in green, has candidates for 1 only in its rightmost column. Therefore, the boxes above and below this one cannot have a one in the rightmost column because it would conflict with the 1 in the middle box. In particular, 1 can be exluded from the three cells in the rightmost column identified by the red arrows. You can exclude candidates by clicking once on them or by typing the minus sign followed by the number. Notice that intersection is somewhat less powerful than scanning: rather than fully determining the number for a cell, it merely excluded certain possibilities.
Consider the following grid.

The last row is the one of interest. If you combine the candidates for the first three columns, you will see that only 2, 3, or 5 can go in these cells. Since each one of these three cells must eventually be filled with a number, the numbers 2, 3, and 5 must be distributed among them somehow. Therefore, 2, 3, and 5 cannot go anywhere else in the row. Therefore, the candidates circled in red can be excluded.
This technique can be applied more generally. You need to find a set of n cells that belong to the same group. If you combine the candidates for these cells, there must be exactly n of them. In this case, you can exclude those candidates from the remaining cells in the group.
It is fairly common to find sets of two or three cells. Sets of four are possible, but more rare. They are also harder to find.
The simplest form of coloring is shown in this grid.

In this grid the fours have been highlighted. Also, some of the cells in this grid have been colored green and blue. These cells are candidates too, but the color overrides their highlighting. You can color any cell you want by hitting a key when the cell is selected: B for blue, G for green, R for red, and Y for yellow.
Your job is to determine which cells should have a 4 in them and which should not. Start by thinking about the cell in the last column (fourth row). Either it has a 4 in it or not. We don't know which option to pick, so let's just call this choice "green" (any arbitrary name would work). Now look across the row this cell is in (by following the arrow). Only one other candidate is in the same row (at column 2). If the original cell is a 4, then this one cannot be, and vice versa. Consequently, this cell is colored blue to represent the opposite choice from the original one.
We can continue this way by following the arrows. There is only one candidate in the same box as the blue one. If it has a four, then the blue cell cannot. So we color it the opposite color, green, to represent the opposite choice. Notice that the two green cells either both contain fours or else neither of them do. Continuing, the candidate in the bottom row is colored blue because it is the only other one in the same column as the green one.
Now look at the selected cell in the bottom right corner. It's in the same column as a green cell and the same row as a blue one. One thing we know for sure is that we must pick either the green option or the blue option. In either case, the selected cell will be in the same row or column as a cell with a 4 in it. Therefore, we can exclude it as a candidate.
This tactic is pretty easy to apply, but it rarely works. You start from a cell, giving it an arbitrary color, and move to other cells via rows, columns, or boxes that contain only one other candidate. The other candidate gets the opposite color from the original one, and you move on from there. If a cell appears in the same group as two different colors, it can be excluded.
Sometimes its possible to exclude multiple colors simultaneously. For example, look at this grid, where fours are highlighted again.

In this case we started coloring with the green cell in the fourth row and ended up at the green cell in the eighth row. But now the second column has two green cells in it! Remember that if any green cell contains a 4, then every green cell contains a 4. But in that case, there would be two fours in the second column---an impossibility. Hence, no green cell has a 4 while every blue cell does.
After a while, colors will begin to seem quite natural. Some puzzles require two different sets of colors to solve. See if you can find one.
Consider the following grid. All of the 2 candidates are highlighted.

Notice that in the fifth column and in the last column there are only two 2 candidates. Furthermore, in both columns the candidates are in the same rows (the sixth row and the last row). We have labeled these candidates A, B, C, and D. We call the fifth column "column AC" and use similar names for column BD and rows AB and CD.
Because columns AC and BD have only two 2 candidates, a 2 must be placed either in cells A and D or in cells B and C. Either way, the 2 in row AB must go in either A or B and the 2 in row CD must go in either C or D. Consequently, the other 2s in these rows can be excluded (they are circled in red).
This same pattern can also occur rotated 90 degrees: there may be two rows with only two candidates in the same positions. In this case, any other candidates in the same columns can be excluded.
A swordfish pattern is similar to an X-Wing. The grid below shows and example. The 3 candidates have been highlighted.
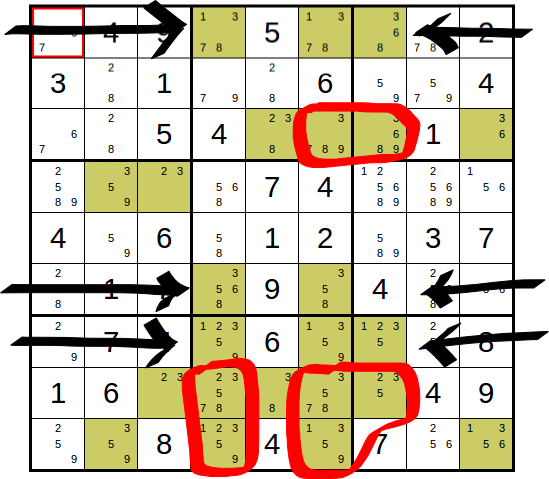
In this case, three rows have been identified with arrows. Each one of them has at most three 3 candidates, and those candidates occur in the same columns (the third, fifth, and sixth columns). Notice that one of the rows only has two 3 candidates. That's okay---all that matters is that these rows not have candidate 3s in any columns except for the third, fifth, and sixth.
The reasoning is similar to X-Wing. Each of the three identified rows must contain a 3, and the 3 must occur in one of the three given columns. That means that the 3 in the third, fifth, and sixth columns must occur in one of the identified rows. Thus, candidates from the other rows can be excluded. They are circled in red.
Though the names are similar, an XY-Wing pattern is different from an X-Wing. The grid below shows an example.

The three blue circled cells, labeled X, Y, and Z, form the XY-Wing. The three cells share three candidates, 5, 7, and 9, but each has only two of them. Additionally, X and Y are in the same group (the upper middle box) and Y and Z are in the same group (the second row). These three cells form an XY-Wing.
Now consider the cell whose candidates are circled in red. It is in the same group as X and the same group as Z. It also shares a candidate, 5, with X and Z. However, if this red cell actually contained a 5, then Z would have to be a 9 and X would have to be a 7. This would leave no candidates for Y. Thus, in any XY-Wing pattern, we find all cells sharing a group with X and Z that have a common candidate and exclude that candidate. In this case, the 5 is excluded from the cell in red.